How to Apply Highlighter for a Natural Glow
Highlighter is a product I avoided for years, terrified of looking like a disco ball. But once I learned how to use it strategically, I realised how much it can improve your makeup look. It brightens the high points of the face, adds dimension, and brings life back after foundation evens everything out.
For skin over 30, highlighter can be especially flattering and can create a fresher, more youthful look. But the key is placement and texture. A subtle sheen = elegant. Chunky glitter = harsh, and it tends to emphasise pores and fine lines.
This guide breaks down how to choose the right highlighter, where to place it, the best tools, and which formulas actually work on real, lived-in skin.
Skin Prep for a Smooth, Lit-From-Within Finish
- Hydrate with a lightweight moisturiser. Skip heavy creams in the day if makeup tends to slip.
- Blur strategically with a soft-focus primer only on pores/lines. Leave the high points primer-free so glow grips naturally.
- Base with your chosen foundation/tint. Set only where you crease or get shiny (usually T-zone).
Choosing the Right Highlighter Texture
Highlighter works best when it complements your base. Here’s a breakdown:
- Liquid/serum highlighter → Best over liquid foundations or tinted moisturisers. Gives a glossy, “glass-skin” effect.
- Cream/balm highlighter → Melts into skin for a soft-focus glow. Ideal for normal-to-dry or combo skin.
- Complexion boosters (like e.l.f. Halo Glow or Charlotte Tilbury Flawless Filter) → Sheer radiance that can go under, mixed with, or over base.
- Powder highlighter → Great if you set with powder or want long wear. Look for micro-fine, non-glitter formulas.
Where to Apply Highlighter (and Where to Avoid)
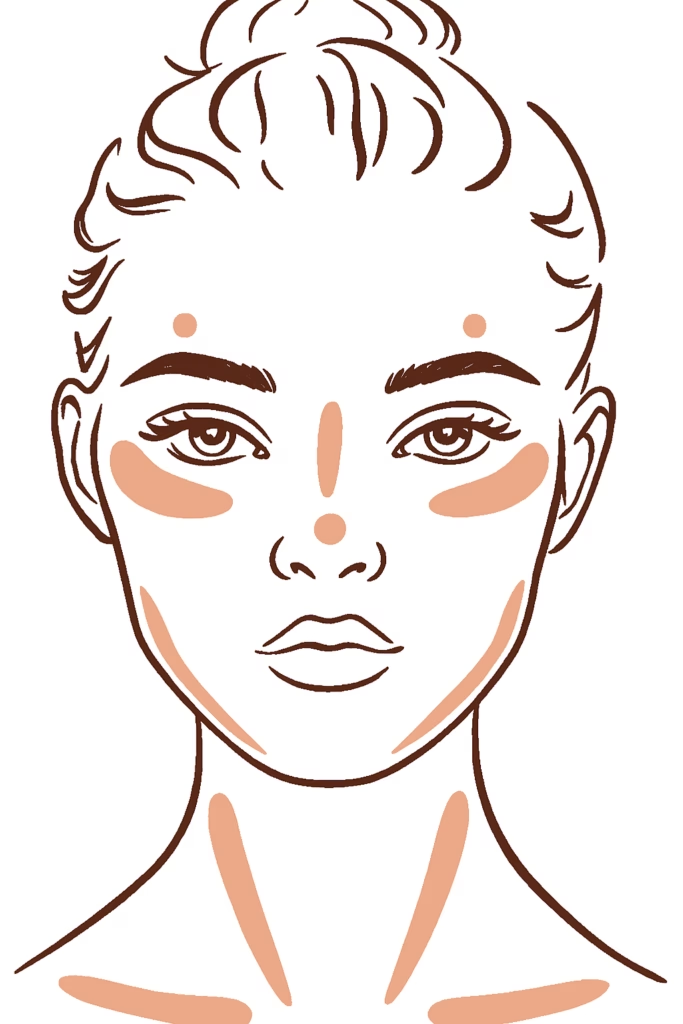
High points that catch the light naturally:
- Tops of cheekbones (stop in line with outer corner of the eye)
- Brow bone (under the arch)
- Cupid’s bow
- Bridge of nose (light touch)
- Inner corners of eyes (tiny amount, non-glitter)
- Collar bones
Avoid: active breakouts, areas with deep lines, apples of the cheeks (emphasises pores).
Tools and Techniques
- Fingers → Best for creams/liquids; warmth helps melt product in.
- Damp sponge → Seamless, skin-like diffusion.
- Highlight brush (fan or tapered) → Precise powder placement.
- Tap, don’t drag → Prevents disturbing your base.
Pro trick: Spritz a sponge with setting spray and tap over powder highlight for a crease-free, glassy finish.
My Favourite Highlighters

e.l.f. Halo Glow Liquid Filter
A versatile glow product that can be used under, mixed with, or over your base for a soft-focus, luminous finish.
How to use it:
- As a primer: Apply a sheer layer under foundation for lit-from-within radiance.
- Mixed with base: Blend a drop into foundation or skin tint for a subtle all-over glow.
- Targeted highlight: Dot on cheekbones and temples after foundation, blending with a sponge.
Tip: Lightly set the centre of your face so the glow stays strategic and doesn’t turn shiny.
Sculpted by Aimee Cream Highlighter
A creamy, blendable formula that melts into skin for a natural everyday glow.
How to use it:
- Everyday glow: Tap onto the tops of cheekbones after applying base.
- Layering: Apply over foundation or skin tints in a “C-shape” around the outer eye for a youthful lift.
- Mature skin tip: Keep placement high on the cheekbones, avoiding the front of the cheek if pores are visible.
Rodial Glass Highlighter
A high-impact, serum-like highlighter designed for targeted radiance rather than all-over glow.
How to use it:
- Event-ready: Use as the final step for a refined, mirror-like sheen (keep application micro-targeted).
- Precision: Apply a tiny dot to cheekbone peaks, Cupid’s bow, or the tip of the nose.
- Mix-in: Add a drop to moisturiser on bare-skin days for a fresh, glossy look.
Comparison: Which One Should You Choose?
| Product | Texture/Finish | Best For | How I Like to Use It |
|---|---|---|---|
| e.l.f. Halo Glow Liquid Filter | Sheer, soft-focus radiance | Everyday radiance, mixing with base, subtle highlight | Under foundation or dotted on cheekbones |
| Sculpted by Aimee Cream Highlighter | Creamy, seamless sheen | Natural, controlled glow; normal/dry skin | Tap on cheekbones for soft lift |
| Rodial Glass Highlighter | Liquid, glossy sheen | High-impact pinpoint shine; events | Micro-dot on peaks, layered last |
Common Mistakes to Avoid
- Using too much; start with a rice-grain amount.
- Highlighting too close to the nose (emphasises pores).
- Glitter formulas for daytime (choose micro-pearl instead).
- Dragging product over an unset base (it’ll move foundation).
- Placing highlight below the cheekbones (drags face down).
Face Shape Placement Tweaks
- Round: Keep high and back toward temples to lift.
- Long: A touch on the apples of the cheeks balances length.
- Square: Focus centre of face and soften angles with temple “C-shape.”
- Heart: Keep nose subtle, emphasise cheekbones.
Step-by-Step: Foolproof Highlighter Application Order
- Skincare
- Primer (optional)
- Base (tint/foundation)
- Liquid/Cream Highlighter
- Cream Blush/Bronzer
- Light powder set where needed
- Powder Highlighter (if using one)
Check out my Dewy Makeup Look post for more tips!
FAQs
Yes, choose cream/liquid with ultra-fine pearl. Keep it micro-targeted.
Creams: highlighter first, then blush. Powders: blush first, then highlight.
Not if you apply strategically. Set the T-zone and keep glow on the outer planes.
Not at all, but it’s the fastest way to add freshness and dimension to a simple routine.
Shimmer = visible sparkle (risk of emphasising texture). Glow = fine pearl that mimics natural light.